Join the ![]() newsletter
newsletter
Subscribe to our monthly newsletter and get £10 off your first order! Don’t miss out on being part of the club!
THE COMPLETE GUIDE TO WOOD FILLERS

The Complete Guide to Wood Fillers
A good quality wood filler is a vital component of any DIY-ers’ arsenal. If you have a piece of wood with holes, cracks or blemishes, chances are a bit of TLC with some wood filler can have it looking as good as new.
Made from wood by-products, a wood filler can be painted and stained to match your wood type, helping to create a flawless finish.
How to choose the right wood filler?
Firstly, wood filler and putty – though often used interchangeably - are not the same thing.
Wood putty is applied to wood after it is stained or finished. As it’s more flexible than wood filler, it’s perfect when there are very small holes to repair, for example when a nail has been removed.
Wood filler, on the other hand, is best for larger holes and blemishes since it can be sanded and painted once dry.
For outdoor projects, for example, patio furniture or decking, a solvent or petroleum-based exterior filler should be used as they offer the best weather protection. Use a water-based filler for indoor projects.
Some products, such as many Ronseal wood fillers, can be used both inside and outside.
The next consideration is consistency. Thick fillers (with a putty feel) are best for large cracks or holes, whereas thin fillers (more like pancake batter) are used to fill small holes when a smooth finished is desired, on a coffee table or desk, for example.
We also sell wood filler in a variety of colours depending on the material being repaired. It’s also worth reading the label to check the filler is compatible with the wood. Softwoods such as cedar or fir tend to be harder to work with.
Two-part wood fillers can also be used for tough repair jobs, offering a better finish than ready mixed fillers and a surface that is easier to sand.
How to use wood filler
Scrape off any large splinters or paint chips and sand down the area.
- Use a damp cloth to remove any dust or the filler will not stick as well.
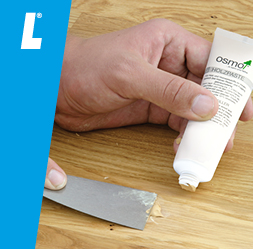
- Apply the filler to the hole either by squeezing it directly out of the tube or by using a putty knife. Overfill the hole slightly as the filler shrinks as it dries.
- Wait for the filler to dry.
How long does wood filler take to dry?
Drying times vary from eight hours to under an hour depending on the product used. If you're looking for fast-drying Osmo interior fillers take just 30 minutes to dry.
Sand the area either using sandpaper or an oscillating power tool. Wipe with a wet cloth before preparing to finish.
Can you stain wood filler?
Wood filler can be easily coloured and stained.
First, choose the most appropriately coloured stain to match your wood. Test the stain on a spare piece of wood or on a small section of the filler. Wait for the stain to dry to see how closely it matches.
Thin the stain with water if it appears too dark, or apply multiple layers if it seems to light.
Apply the stain to the wood filler using a paintbrush. Stains can take one to two days to fully dry.
Can I substitute wood filler for silicone sealant or bathroom silicone sealant?
Silicone sealant is hopeless for filling holes in wood as over time it will shrink.
It can also not be painted, so it’s going to stick out like a sore thumb.
Don’t do it.
Shop our range of woodcare products available including wood filler stains and varnishes.
You can see all our blog posts here.
